
FuseSign Placeholders allow you to add a placeholder ‘stamp’ to create a field where recipients can add data.
For repetitive document types and placeholder locations consider setting up a Placeholder Template.
Placeholder Types
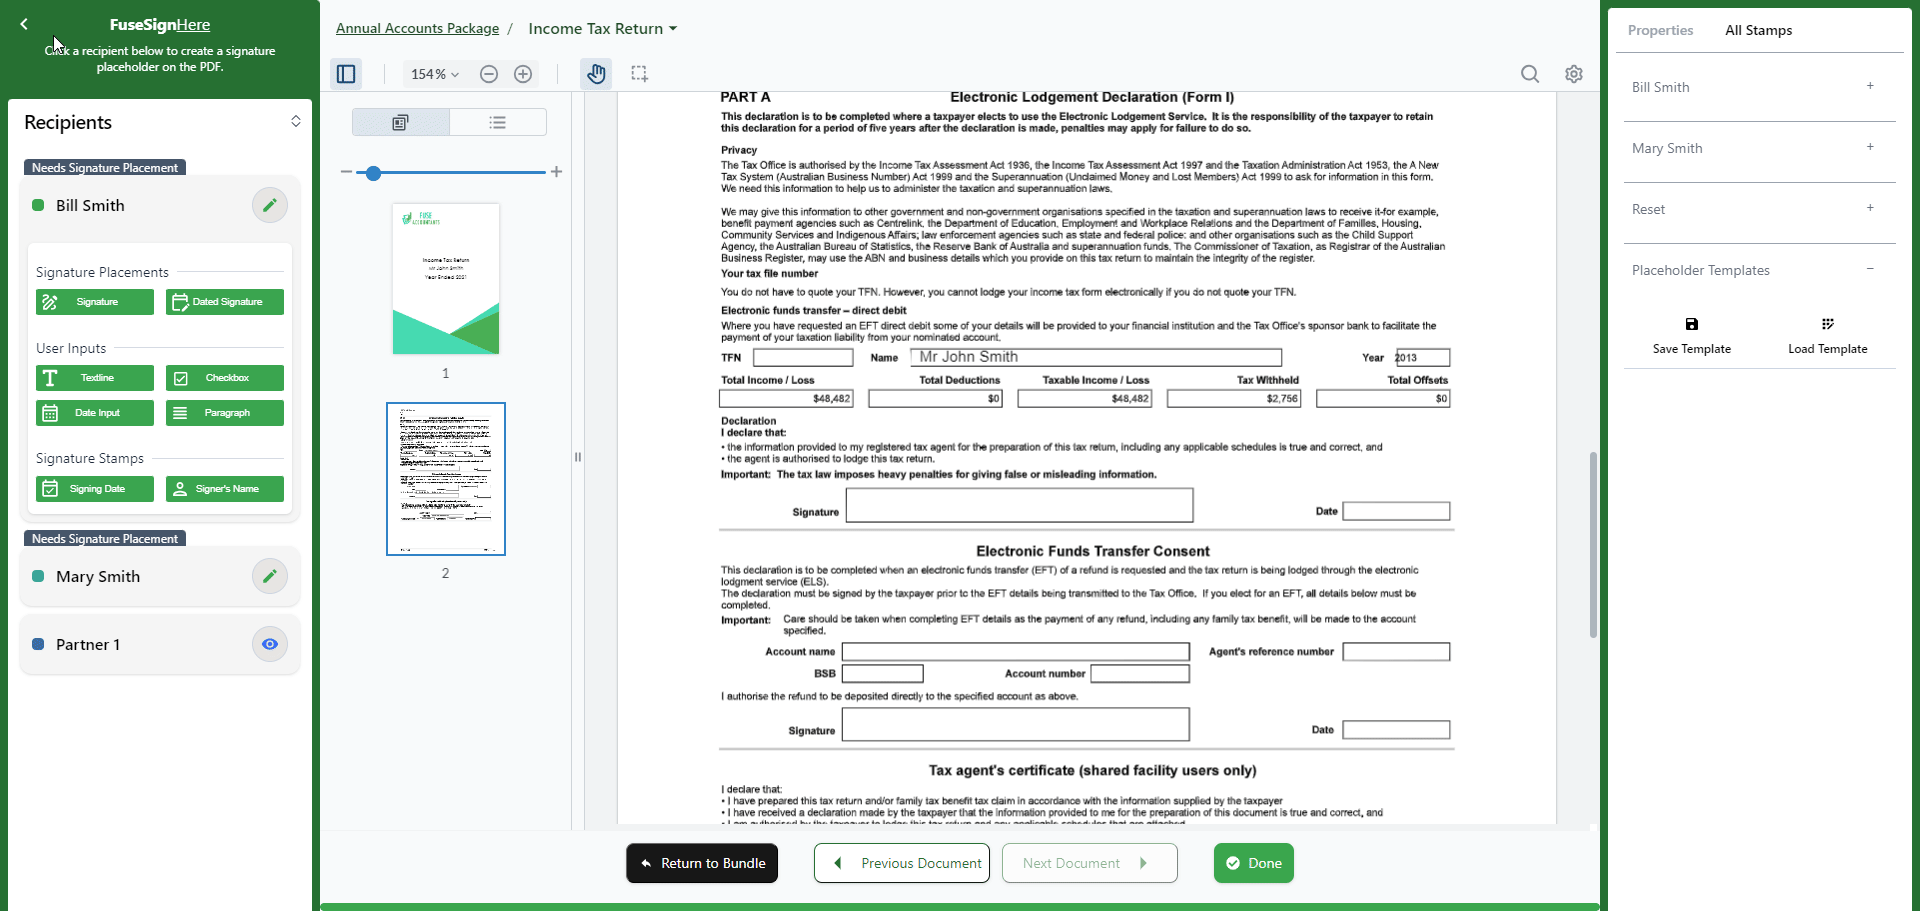
Signature Placements
If a recipient has a signing action on a document, at least one of these placeholders will be required. When your recipient signs, their signature will appear on the document where you place these.
-

-

User Inputs
These options allow your users to fill out additional information on your document. You can also set properties for these inputs from the right panel to make them mandatory, or to assign a default value.
-

-

-

-

-

Signature Stamps
These stamps do not require any interaction from your recipient and will be automatically filled when the document is finalised.
-

-

Using FuseSign Placeholders
When using FuseSign Placeholders you will need to add the placeholders to each of the specific locations within the documents where you want the information to appear.
You can add placeholders via the ![]()

Adding Placeholders
On the left panel, you will see all recipients for the bundle, and their signing action for the current document. Clicking on a recipient name will expand the list of placeholder options to add for them. To add a placeholder to the document, simply drag and drop it into place.
A maximum of 250 placeholders may be applied to a single document.
Changing Signing Actions
If you need to change a signing action for a recipient, you do not have to go back to the bundle creator screen. Simply click on the icon next to the recipients name on the left panel and select their new action.
Stamp Properties
For any User Input placeholders you will have further options to edit the properties of those stamps. From this panel, you can make the selected placeholder mandatory to be filled by the client, or enter a default value.
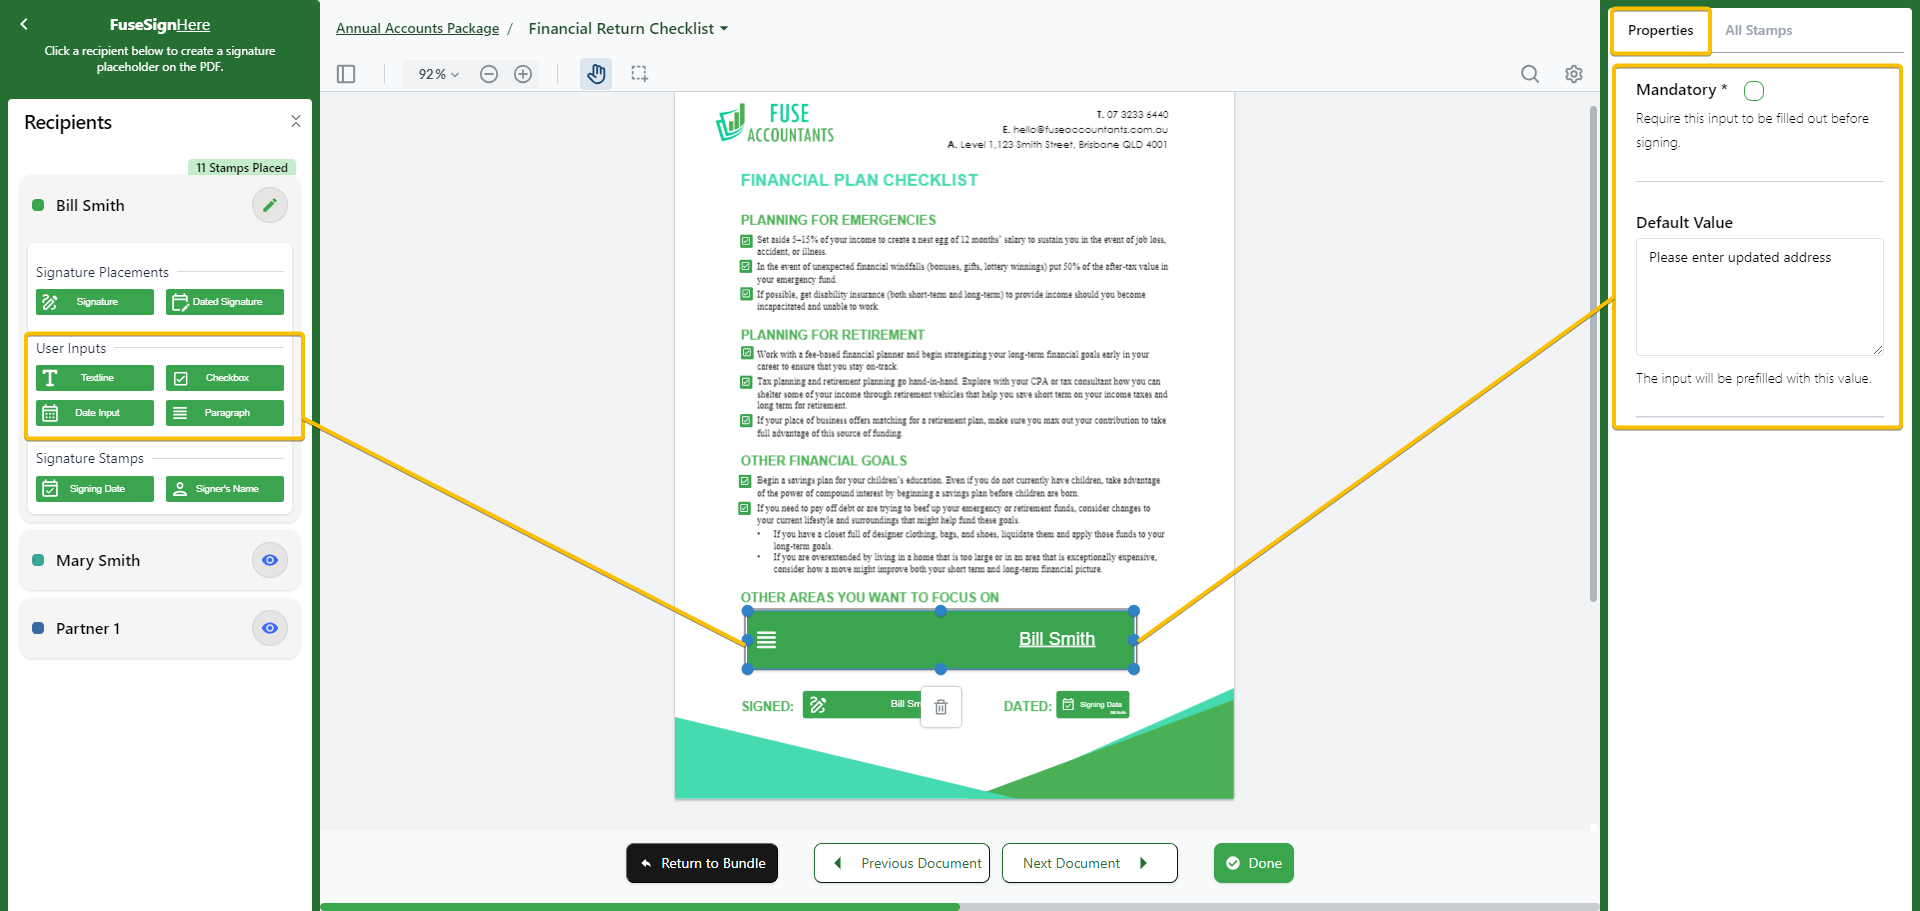
Mandatory Field
By marking an input field as Mandatory, the recipient will be required to enter a value in order to complete signing.
Default Value
Adds a default value to the stamp, depending on the type of input field. This could be default text, date, a default check on a checkbox.
When a default value is set for an input field, it is treated as an actual input, not just display text. This means the system considers the field “completed” even if the recipient doesn’t change it.
For example, if you enter instructions for a client as the default value and mark the field as mandatory, the client could submit the form without interacting with that field, effectively submitting your default text.
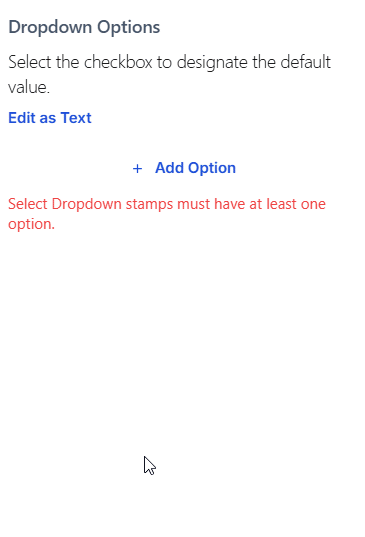
Dropdown Options
Allows you to configure the options available for the recipient to select in a dropdown input field. You can either Edit as Text or Edit as List to add options individually.
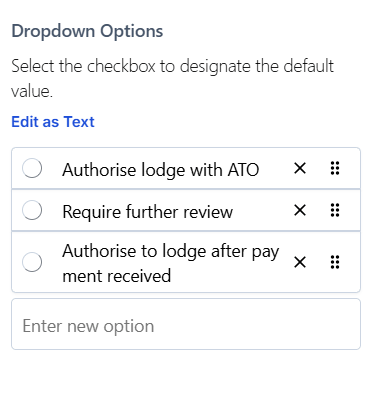
Edit as List
-
Select + Add Option to add an option to your dropdown select
-
Enter each additional option in the blank field
-
Use the grip icon

-
Use the X to delete options from the list
-
Select the bubble to mark an option as the Default Value. If there is a default value in the list, it will be automatically prefilled for the recipient
Edit as Text
-
Select Edit as Text to change to text mode
-
Enter each option of your dropdown select as a new line in the text box
-
Select a Default Value from the dropdown list as required, or leave as No Default Value. If there is a default option in the list, it will be automatically prefilled for the recipient
-
The maximum possible number of Select Dropdown options is 64
-
The maximum character length of a Select Dropdown option 128 chars
-
You cannot have duplicate Select Dropdown options. These are case insensitive (e.g. “approved” is a duplicate of “APPROVED”)
-
For best user experience, please ensure the width of your Dropdown Select stamp is at least the width of your longest Select Dropdown option
-
‘No Option Selected’ will be displayed on signed documents where a recipient has not selected a dropdown selection option (and the placeholder is not marked as mandatory)
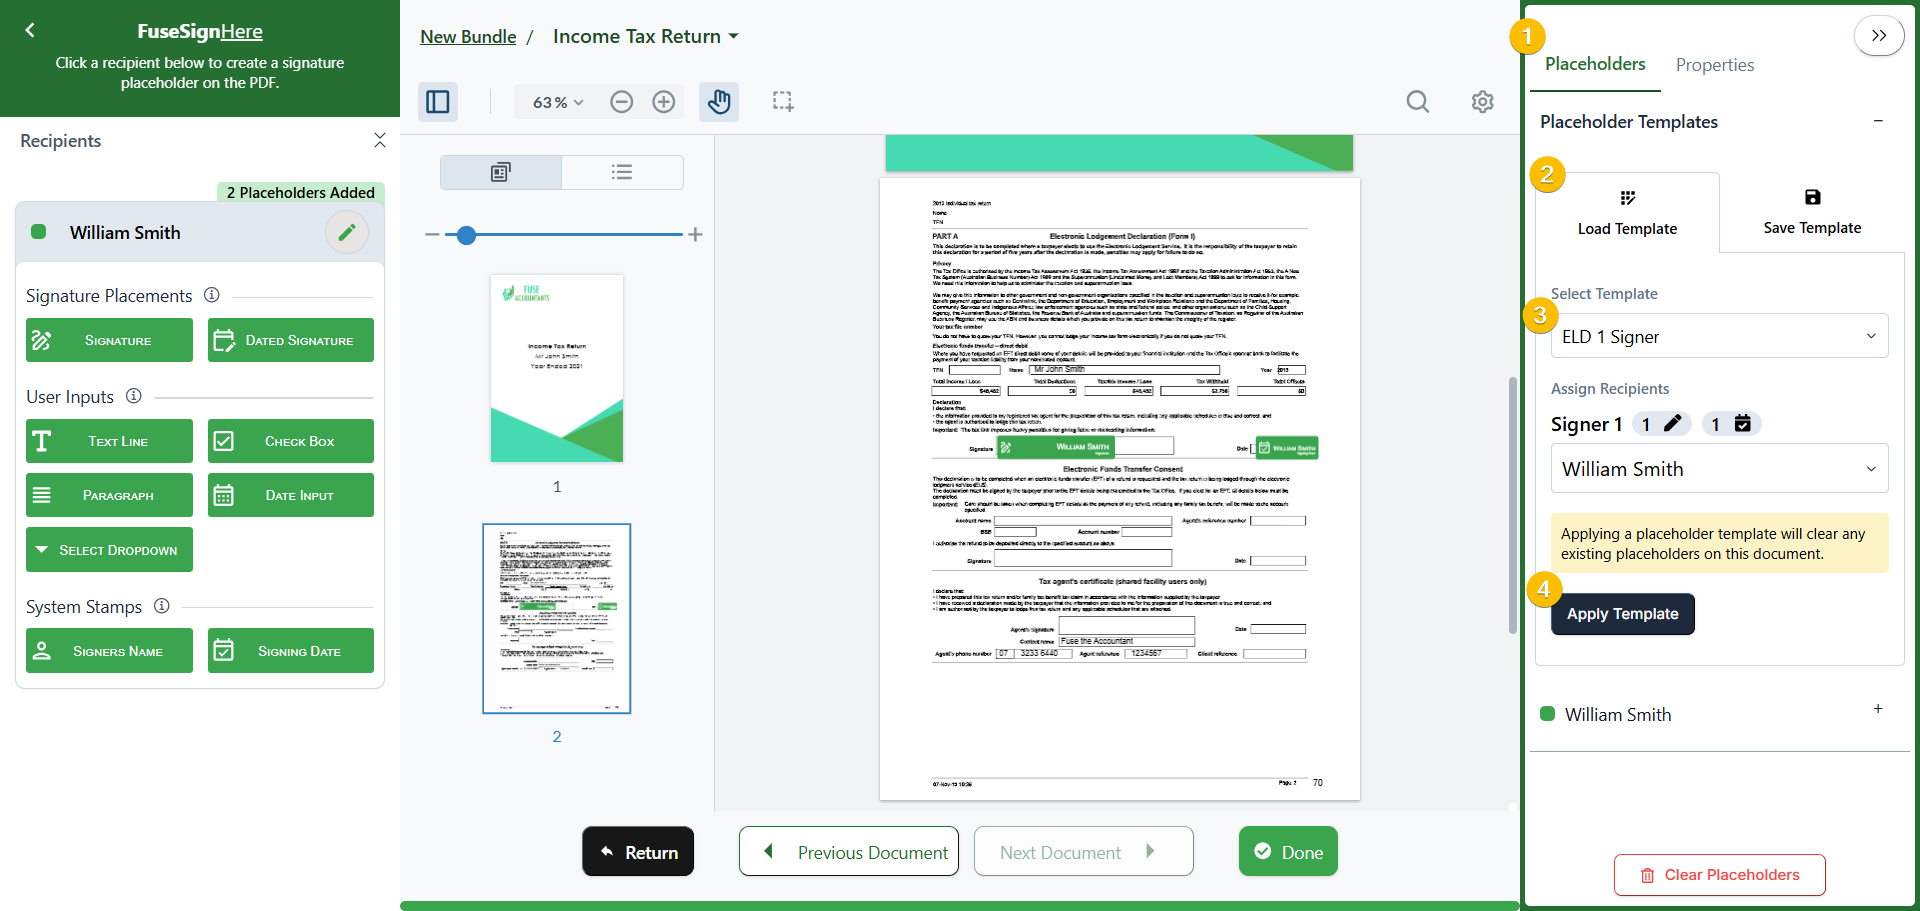
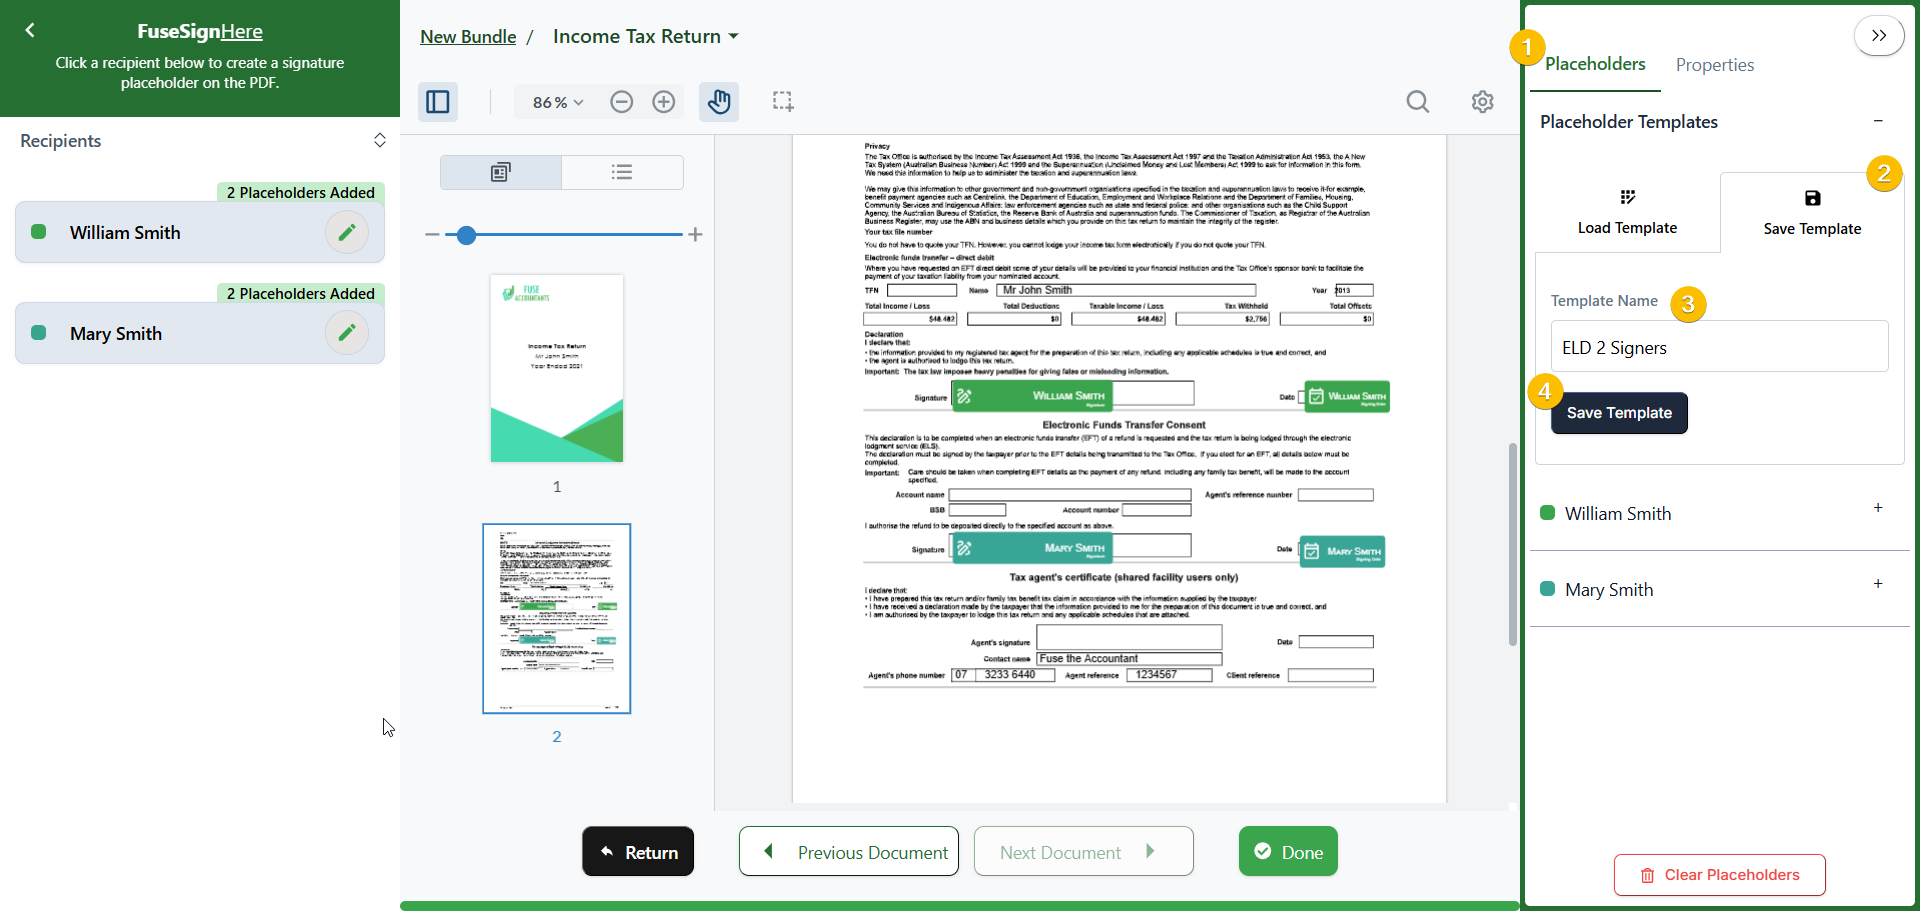
Placeholder Templates
To save or apply a placeholder template go to the right panel under the Placeholders tab and select Save Template to save your current placeholder configuration as a new placeholder template, or select Load Template to apply a pre-existing one.
Deleting Placeholders
To remove placeholders from a document you can either click on the specific placeholder and select the trash icon 
If you want to remove all placeholders for a recipient, this can be done from the right panel under the All Stamps tab. Click on the Recipient, and select the red 
Frequently Asked Questions
Q: Is there a Radio Button option?
A: No. FuseSign does not include a radio button option. If you need your client to select just one option of many, we suggest using the Dropdown Select user input, so recipient will be able to select one option of a group.
Q: Is there a mandatory checkbox/text field option?
A: Yes. You can mark a User Input placeholder as mandatory from the Properties tab on the right hand panel. Please note that if a Input isn’t marked as mandatory it is possible for clients to not submit any information in that field. Recipients will receive a warning that they have not filled out any of the optional fields other than checkboxes, as not-checked is also a valid response.
Q: Why can’t I copy and paste the text out of the placeholder text fields on a completed document?
A: FuseSign flattens the content into the PDF as an image to prevent it from being tampered with before applying the digital certificate.
Q: Can recipients see the content that other recipients have previously added into placeholder text fields?
A: Yes! They might just need to zoom in a little.
Q: Why is the small font size so small on the text field?
A: If a signer enters a lot of text in a small input there may be visibility issues. You can zoom in and use the arrow keys to read the wrapped text. A single-line text field is ideal for single inputs, while a multi-line text field is more suitable for larger pieces of text. To avoid visibility issues, consider increasing the size of the placeholder before sending the bundle.
If you have any questions, please contact our office at support@fuse.work.