
Status: Live (as of 23/09/24)
What’s New + Improved
Before getting into the weeds, here’s the exciting new features included with this update:
Not a good time? You can select ‘Switch back to the original layout' from the banner at the top of the bundle creator page to switch back to the legacy creator
Bundle Details
The first section is the Details section, where you can add the email Subject and Body for your bundle.
If you have a pre-existing Bundle Template, you can use the Apply Template button to select a template and automatically fill these details.
Bundle Settings
The Settings section is where you can apply all necessary bundle settings as required. From here you can:
-
Manually apply a Due Date for the bundle, or review one that has been added by default
-
Review or set Automatic Reminders for the bundle
-
Assign the bundle to a Team, if you are using this feature
-
Apply necessary Tags, if you are using this feature
You also have the option to review the Advanced Settings. Selecting this will bring up a modal that will allow you to dictate:
-
If you want recipients to sign the entire document, or by using placeholders (Bundle Signing Mode)
-
If recipients reject a document, will it reject the entire bundle or just the relevant document (Bundle Rejection Mode)
-
If your recipients will receive their finalised documents as email attachments, or a download link (Document Finalisation Mode)
Some advanced settings options may be disabled, as dictated by your Business Settings
Adding Recipients and Assigning Contacts
By default, each new bundle will star with one recipient in one signing group.
To add a recipient to the bundle, click on the + Add Recipient button in the relevant signing group.
To assign a contact to a recipient, search for the contact name in the available search bar and select the relevant party. This will display their name, email, and mobile number (if applicable). Here there is also a drop down menu to select the verification mode for the contact.
To add another signing group, select the + Add Group button. If you have more than one signing group, you can also drag and drop the recipients between each group. For more information about signing group, please see here.
To remove a recipient from a bundle, select the ellipsis icon 
From the same menu 
You will also notice you have the option to set the bundle actions for the recipient to Sign All or View All documents.
Adding Documents and Signing Actions
As before, you can drag and drop local files into the highlighted area to add them to the bundle, or select Add Documents > Upload Document for the same result.
If you are connected to FYI, you can add documents from there by selection Add Documents > Add from FYI. This will ensure files are being grabbed from and are saving as per your Doc Connector settings.
To remove a document from the bundle, select the x on the right side of the row.
On the left side of the row you can click and drag the drag icon 

As before, you can assign bundle actions for each document to each recipient granularly. Sign means they will have to complete a signing action on the document, View means they are able to view to document but they will have no actions, and None means they will not see the document at all.
You can select the
Adding Placeholders and Placeholder Templates
If your Bundle Signing Mode is set to Signature Placeholders, you will need to apply these placeholders to the documents with signing actions before you can send the bundle.
Adding Placeholders
To add/edit placeholders you can select the + Add Placeholders button at the bottom of the page, if none have previously been placed. Otherwise you can select the open 
On the left panel, your recipients and their signing actions will be displayed. Next to each recipient there will be an icon indicating if they have a sign, view, or none action on the document. You can select this icon to change the recipient’s bundle action.
If the recipient has a signing action on the bundle, you will also see the placeholder options. To add a placeholder to the document, simply drag and drop the icon onto the page, where you want the placeholder to go.
To add placeholders for a different recipient, simply click on the recipient’s name to display their placeholders and add to the document as above.
User Input placeholders (such as text inputs, checkboxes and date inputs) will also have additional options on the right panel under the Properties tab. Here, you can set an input placeholder as mandatory (meaning that your recipient is required to fill it before finalising the document) or add a default value that will be prefill the input when your recipient first sees it.
To remove placeholders from a document you can either click on the specific placeholder and select the trash icon 
If you want to remove all placeholders for a recipient, this can be done from the right panel under the All Stamps tab. Click on the Recipient, and select the red 
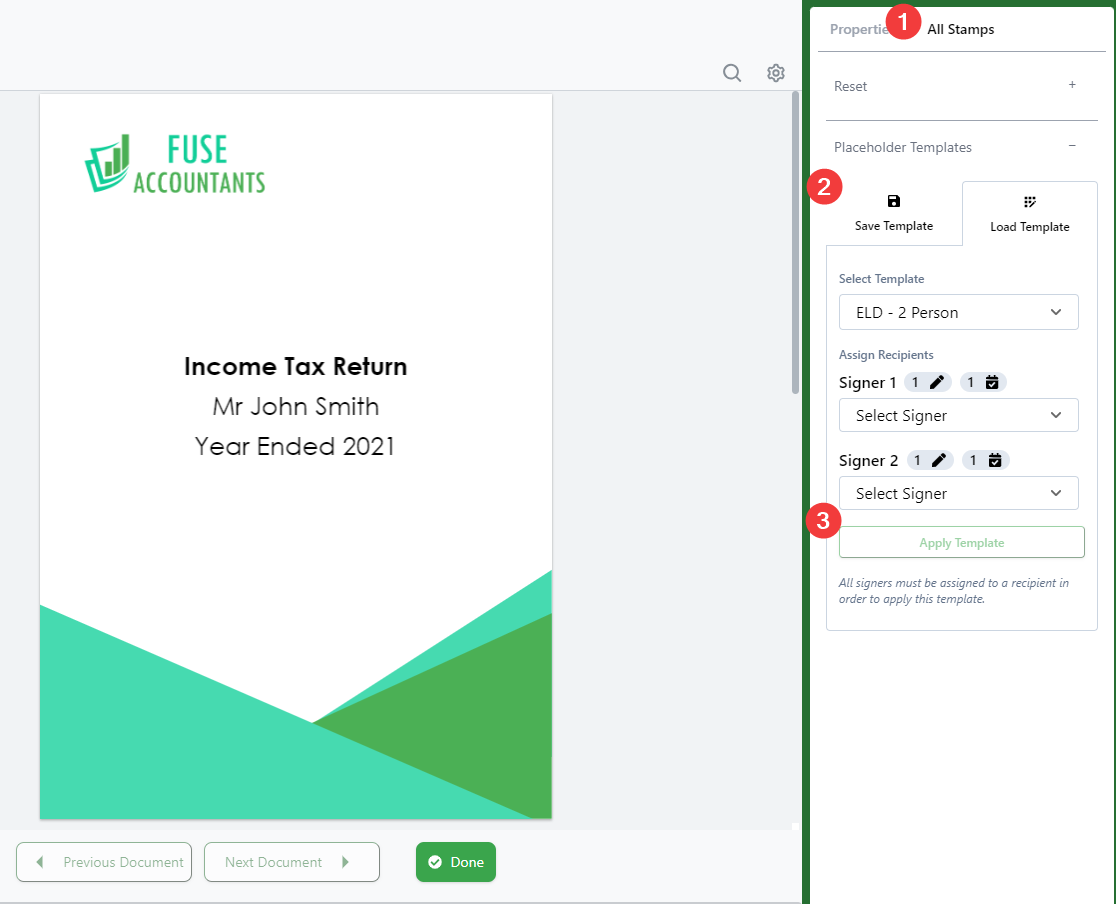
Applying/Saving Placeholder Templates
To save or apply a placeholder template go to the right panel under the All Stamps tab and select Save Template to save your current selections as a new placeholder template, or select Load Template to apply a pre-existing one.
Once you’ve finished adding your placeholders you can use the navigation buttons to move to another document, or select Done when finished.
Placeholder Options
Signature Placements
If a recipient has a signing action on a document, one of these will be required. When your recipient signs, their signature will appear where you place these.
-

-

User Inputs
These options allow your users to fill out additional information on your document. You can also set properties for these inputs from the right panel to make them mandatory or assign a default value.
-

-

-

-

Signature Stamps
These stamps do not require any interaction from your recipient and will be automatically filled when the document is finalised.
-

-

Sending and Saving Bundles
You can use the Save Draft button at the bottom of the page to save the bundle into your Drafts folder. Once you’ve saved the bundle as a draft you will also be given the option to
-
Delete Draft will delete the draft bundle
-
Email will open a new email message in your system default mailbox with a link to the draft
-
Copy Link will copy the link to the draft to your clipboard
When the bundle is ready to send you can select Send Bundle. If any further actions need to be made before sending the bundle, you will be presented with a detailed error message to let you know what needs to be done.
If you have any questions, please contact our support team on support@fuse.work