
CSV Contact Data Sync allows you to upload a CSV file containing your contacts data into FuseSign.
This is useful where a direct data sync to your practice management system is not available.
Preparing Your CSV File
Most practice management systems will include reporting functions that will enable you to prepare and download a CSV file of your data.
What to Include
Your CSV file must include columns for Name, Email, PhoneNumber. You can include other columns in the list and these will be ignored for the data sync process.
You can also include a PreferredName column, to sync preferred names/salutations (if they exist and preferred names sync is enabled for your business).
IMPORTANT: There is a limit of 5000 customers per file upload using CSV Contact Data Sync. You may sync new files at any time and FuseSign will any new records that appear in the file.
Data Quality
Name: Include First Name and Last Name in the same column like John Smith. You may like to use Excel formulas to concatenate or de-capitalise your data prior to upload.
Local Mobile Numbers: Local mobile numbers do not need to include the full country calling code. FuseSign will utilise the default country code in your FuseSign business settings.
International Mobile Numbers: International mobile numbers should be formatted as the full international phone number including the +country calling code. If not then FuseSign will add the default country code and result in invalid mobile numbers.
Extra Characters: There is a common practice to include extra notes at the end of an email or mobile record to identify the owner of the mobile number on file - for example “0411 111 111 (Leanne)”. FuseSign is unable to process any phone numbers or emails that contain extra characters that render them invalid so it’s a good practice to clean these up prior to syncing your data.
Data Matching
If a CSV upload contains a contact that has the same details (Name/Email/Mobile if applicable) as a manual contact than this manual contact will be updated to a CSV synced record.
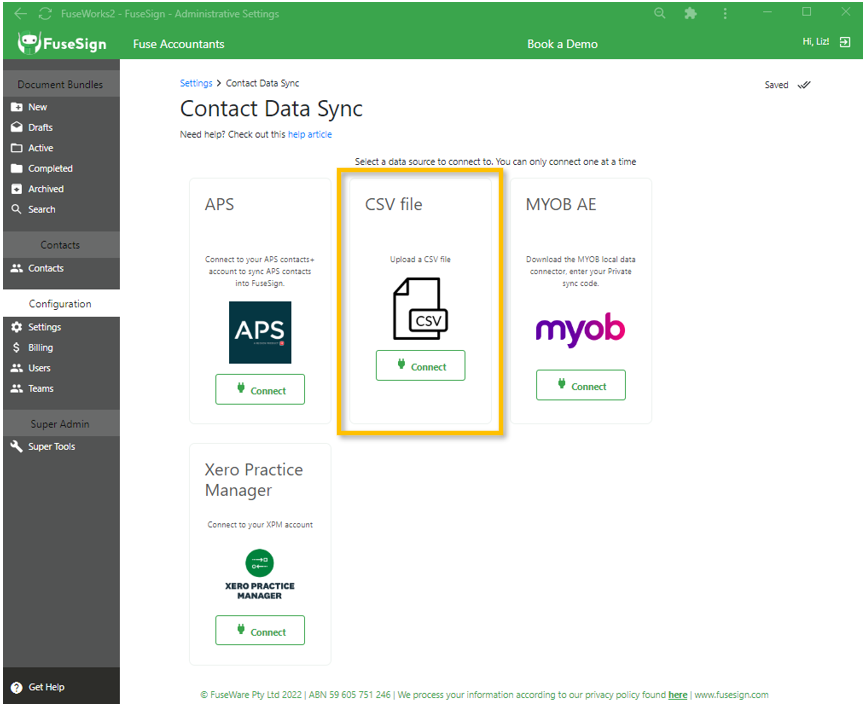
Connecting CSV Contact Data Sync
Only users delegated as a FuseSign Champion role can connect CSV Contact Data Sync.
Step 1: Select Settings on the side navigation bar accessible from any screen in FuseSign.
Step 2: Select “Connect” in the CSV file box.
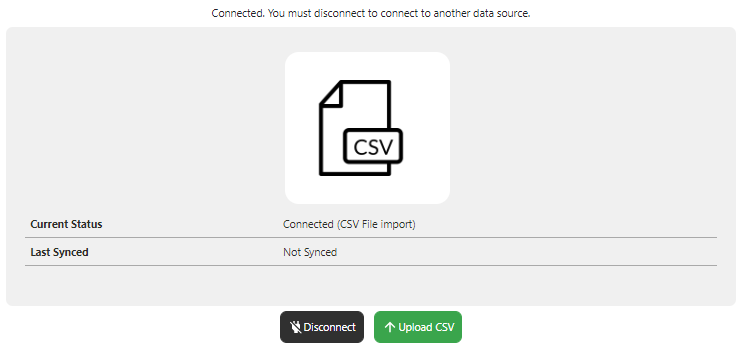
Step 3: You will be presented with information that you are now connected, but not yet synced, and given the option to upload a CSV.
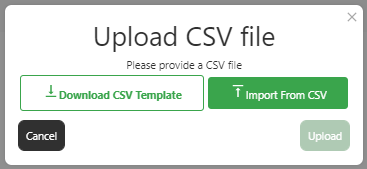
Step 4: Click Upload CSV to download the CSV template with pre-named column headings if this is your first time connecting, or to import a pre-saved CSV > click upload > your sync will begin in the background.
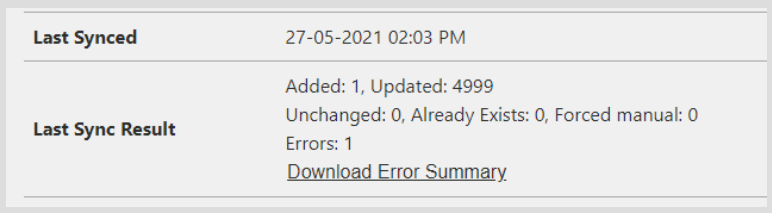
Step 5: Once the sync is completed, you can revisit the page and see your sync results. You can click Download Error Summary to review any errors from the upload.
Automatic Updates
CSV Contact Data Sync does not automatically update. Should you wish to update your sync, you will need to repeat the above steps to sync your updated CSV file.
You do not have to re-upload a master list of contacts when updating. So long as the CSV integration isn’t disconnected entirely, you can upload a CSV of new contacts to be added and previous additional will remain as synced contacts.
Related: Read more here to understand the Contact Data Sync record update logic.
Contacts on Active Bundles: Contact details will update for contacts on active bundles. If an email address has changed you will need to trigger a reminder to resend the bundle to the correct email address. If a mobile number has changed then the recipient can use their existing bundle link and continue as usual.
If you have any questions, please contact our support team on support@fuse.work